
Winding a Warp Part 1: Warping Board Setup, and Planning Your Path
Plus how to make a porrey cross—and why you need one.
For 50 years, teachers at Yarn Barn of Kansas have seen just about every challenge a beginning weaver might meet. What better way to share this knowledge than with a series of articles about ways to make the process of weaving simple and rewarding? We‘ll begin with this installment about winding a warp using a warping board.
Setting Up Your Warping Board
Warping boards (see photo at top) are a common tool for starting a weaving project. They do three things: they help you measure out a warp of a predetermined length, they make sure all the ends in that warp are the same length, and they put those ends in order. In the United States, most warping boards measure 1 yard horizontally—but mini warping boards and boards that measure in meters are also available, so it’s important to know the peg distance on your board before you begin winding.
The boards can be permanently fastened to a wall, or they can be clamped to a table or sit on an easel. Because straining to reach the pegs on a warping board can become tiring over the course of winding a full warp, make sure the board‘s height is comfortable for you and your shoulders.
Warp length is measured by winding the yarn around a series of pegs on your warping board. To make sure the warp you wind is the right length, you'll start by making a guide string. Measure out a piece of scrap yarn that is the length of your planned warp (for visibility, a color that contrasts with your planned warp is best). The guide string will help you figure out the path your warp should take on the warping board, and it will remind you of that path as you wind.
Plan a Path
If your warp is an even number of yards long and you‘re using a standard warping board, the path your fiber will take back and forth across the full width of the board should be easy to figure out. Here‘s how to get that path set up.
Using the picture below as a reference, put a slip knot on one end of the guide string. Place the loop on peg A and extend the yarn around peg E, travelling over C along the way. Follow a side-to-side path so the guide string ends at a peg. Add a slip knot, and place the loop on the ending peg.
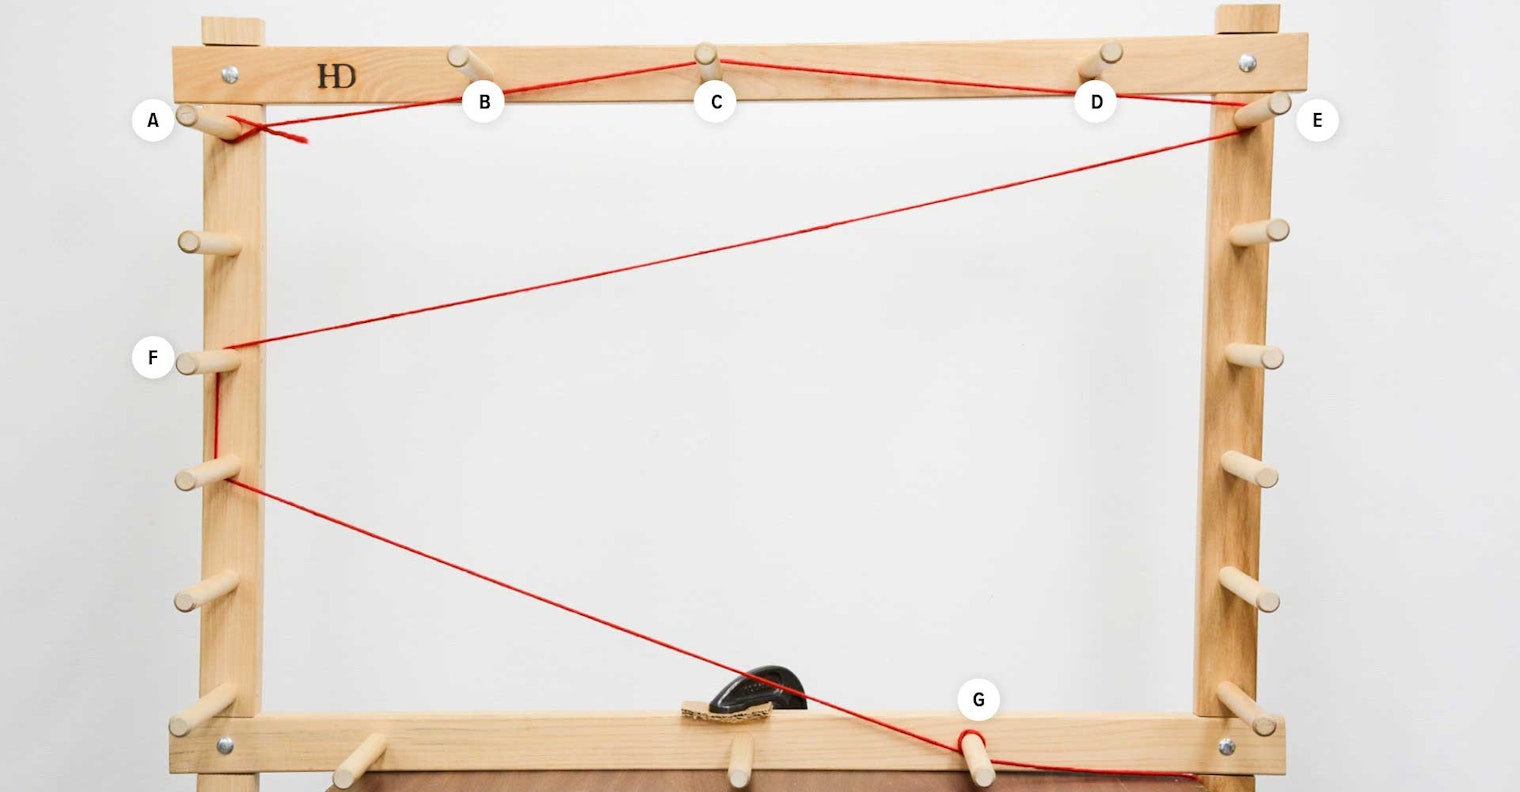
If your warp length includes a fraction of a yard, start by following the same process. Loop the end of your guide string on peg A, but after it travels around peg E, experiment with the path it takes so it ends at a peg. This path might include movement from side to side or along a side, as shown in the photo at the top of this article (it should never double back on itself, though). Add a slip knot on the other end, and slip the loop on the ending peg.
The guide string shows the general path your yarn will follow as you wind your warp, whatever its length. Read on to learn about one minor detour it needs to take along the way.
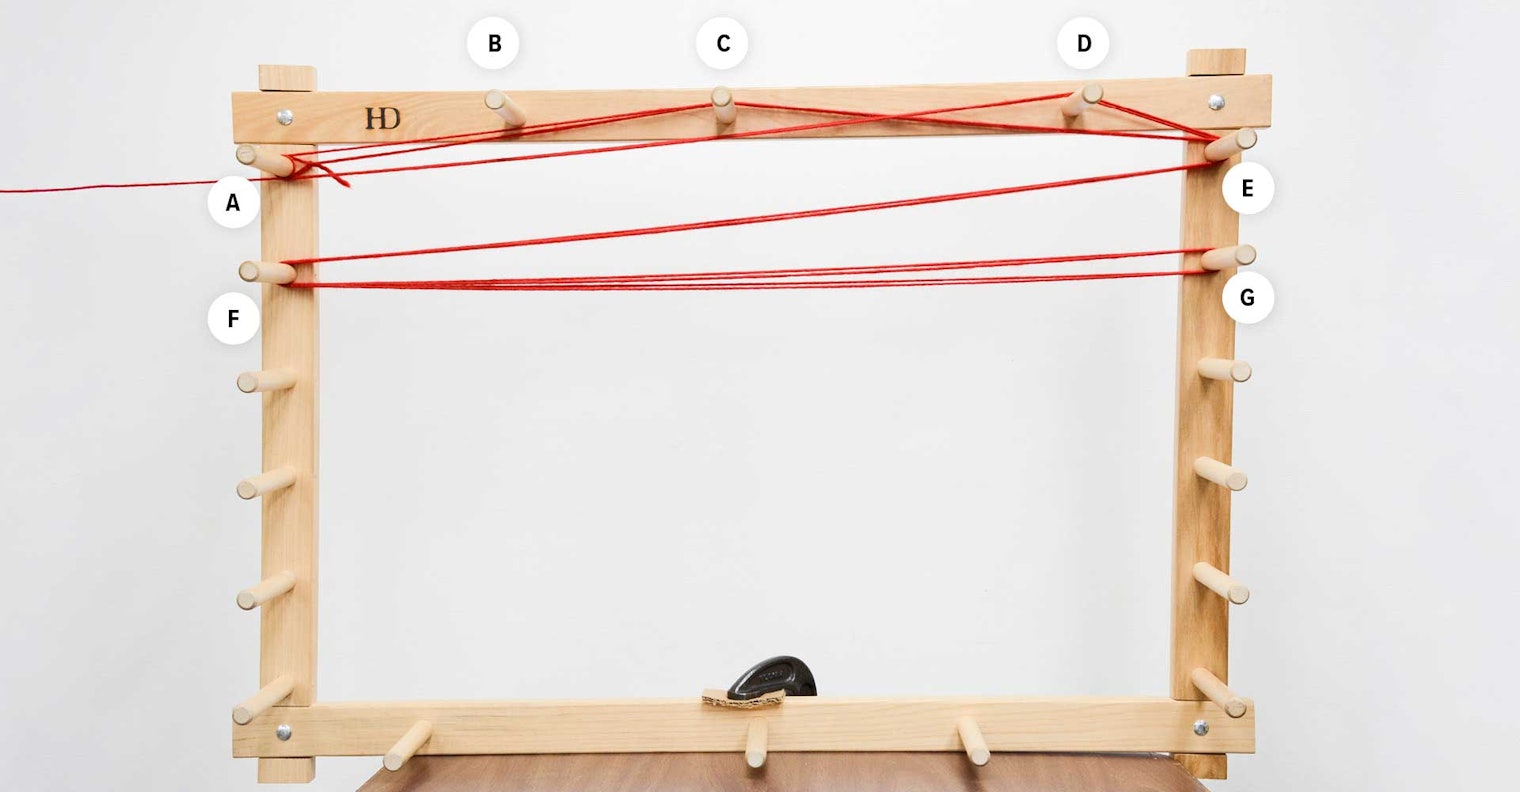
This 3-yard warp is wound using the full width of the board. It has a porrey cross between C and D—which is more than 12" from the starting peg A.
What‘s a Porrey Cross?
As you wind a warp using your project yarn, you‘ll be making a detour, called a porrey cross, between two of the pegs at the top of your board. When you come to the first porrey cross peg, go over it. When you come to the second one, go under it. Why make a porrey cross? Because it‘s a good way to help you keep track of how many ends you‘ve wound as you go, and it keeps all the warp ends in the right order for when you put the warp on your loom.
The example just above shows a 3-yard warp being wound. For positioning the porrey cross, you pick two pegs on the top rail that are at least 12" from the starting peg A. Tie your project yarn onto peg A, go over C, under D, and then zigzag across and down to the end point G, which is 3 yards from A. Retrace back to A, going over D and under C. You have now measured two warp ends, each of them three yards long. Continue winding your warp until you have the number of ends you need.
As you wind, remember that at the cross you always go over the first peg you come to and under the second peg. When returning to the cross from the other end, you still want to go over the first peg you come to and under the second peg. (Notice that peg B is not used at any point in our example. You won’t always use every peg on a warping board.)
Warping Tips
1: Do not pull the yarn tight as you wrap it around the warping board. Keep the yarn tension consistent—neither saggy nor strained. Stretched yarn risks damaging the board by bending pegs or pulling them out, and it can leave you with a short warp when tension is removed and the yarn returns to its unstretched length.
2: Keep cones and tubes upright on the floor. Use a cone stand if necessary so the yarn unwinds onto the warping board smoothly without tugging on the cones or pegs. Keep yarn balls in a bowl or box and frequently check to make sure they‘re unwinding smoothly.
3: If you need to fix a mistake, carefully wind the yarn back onto the cone or ball peg by peg until you get to the problem. This prevents unnecessary tangling.
MORE: For a print-friendly version of this information, check out the Best Practices eBook. You'll learn next steps as well—including tips for counting, how to wind stripes, removing your warp from the board, threading and sleying, winding on, interpreting drafts, and fixing mistakes.
SUSAN BATEMAN, weaver and teacher, started Yarn Barn 50 years ago. Her hobbies include weaving, working on the farm, volleyball, and bridge.
MELISSA PARSONS has been weaving since 1988. She started working with Susan Bateman at the Yarn Barn in 1992.
Winding a Warp Part 2: How to Wind a Striped Warp, and Keeping Tangles at Bay
Plus two tips for quickly and easily counting all those ends.
Part 1 of this series teaches you how to plan a path on your warping board, and how and why to create a porrey cross, along with providing some general tips about winding a warp.
In this Best Practices installment, we‘ll cover a few more things you should know about winding warps: How to wind warp stripes, some tips for keeping track of how many ends you‘ve wound, and how to take your newly wound warp off the warping board without losing control of all those ends.
Striped Warps
If your draft includes stripes, you‘ll need to change yarn colors as you wind your warp. To do that, tie the last thread of the working color to either the beginning or ending peg in your warp path, depending on how many ends each stripe has. Start the next color by tying on to that same peg, and continue winding.
If the stripes all have an even number of ends and you‘ll be using a color again, you can put an inactive color “on hold.” Take the thread to the outside of the left side of the board and wrap it several times around an unused peg. When you‘re ready for the color again, simply unwrap it, bring it back up to the starting peg, and continue winding. If your stripes have odd numbers of ends, cut and tie off each color as you finish it.
Keeping Count
Whether we‘re preparing a warp or treadling a pattern, sometimes it seems like all weavers do is count! While winding a warp, you can save a bit of time and confusion with counting shortcuts.
Here‘s one—because half of your warp ends go over the first peg in your porrey cross, count the number of threads on the top of that peg and multiply it by 2. If your last warp end finished at the beginning peg, that result is the number of warp ends you‘ve already wound. If your last warp end finished at the ending peg, subtract one end from that result for the total number of warp ends wound.
Another shortcut is to loop or tie a piece of scrap yarn around groups of warp ends as you wind and count them. If you loop around the same number of ends each time (ten works well), you can count the groups and multiply by the number of ends per group to find the total number of ends you‘ve wound.
Removing the Warp
So you‘ve finished winding your warp, and double-checked the number of warp ends. Now how do you remove all those ends from the warping board without turning the whole thing into a snarled mess? The answer is ties and chains.
Tying: To secure the porrey cross, tie it with scrap yarn using firm bows in five places—one right around the middle of the cross, and one each on the upper and lower sections coming out of each side of the cross (see the photo of chaining a warp, below left). Don‘t use knots for these ties—you‘ll eventually want to remove them by pulling an end, rather than by using scissors (gasp!) near your newly wound warp. For extralong or slippery warps, also add firm bows at the midpoint of each yard.
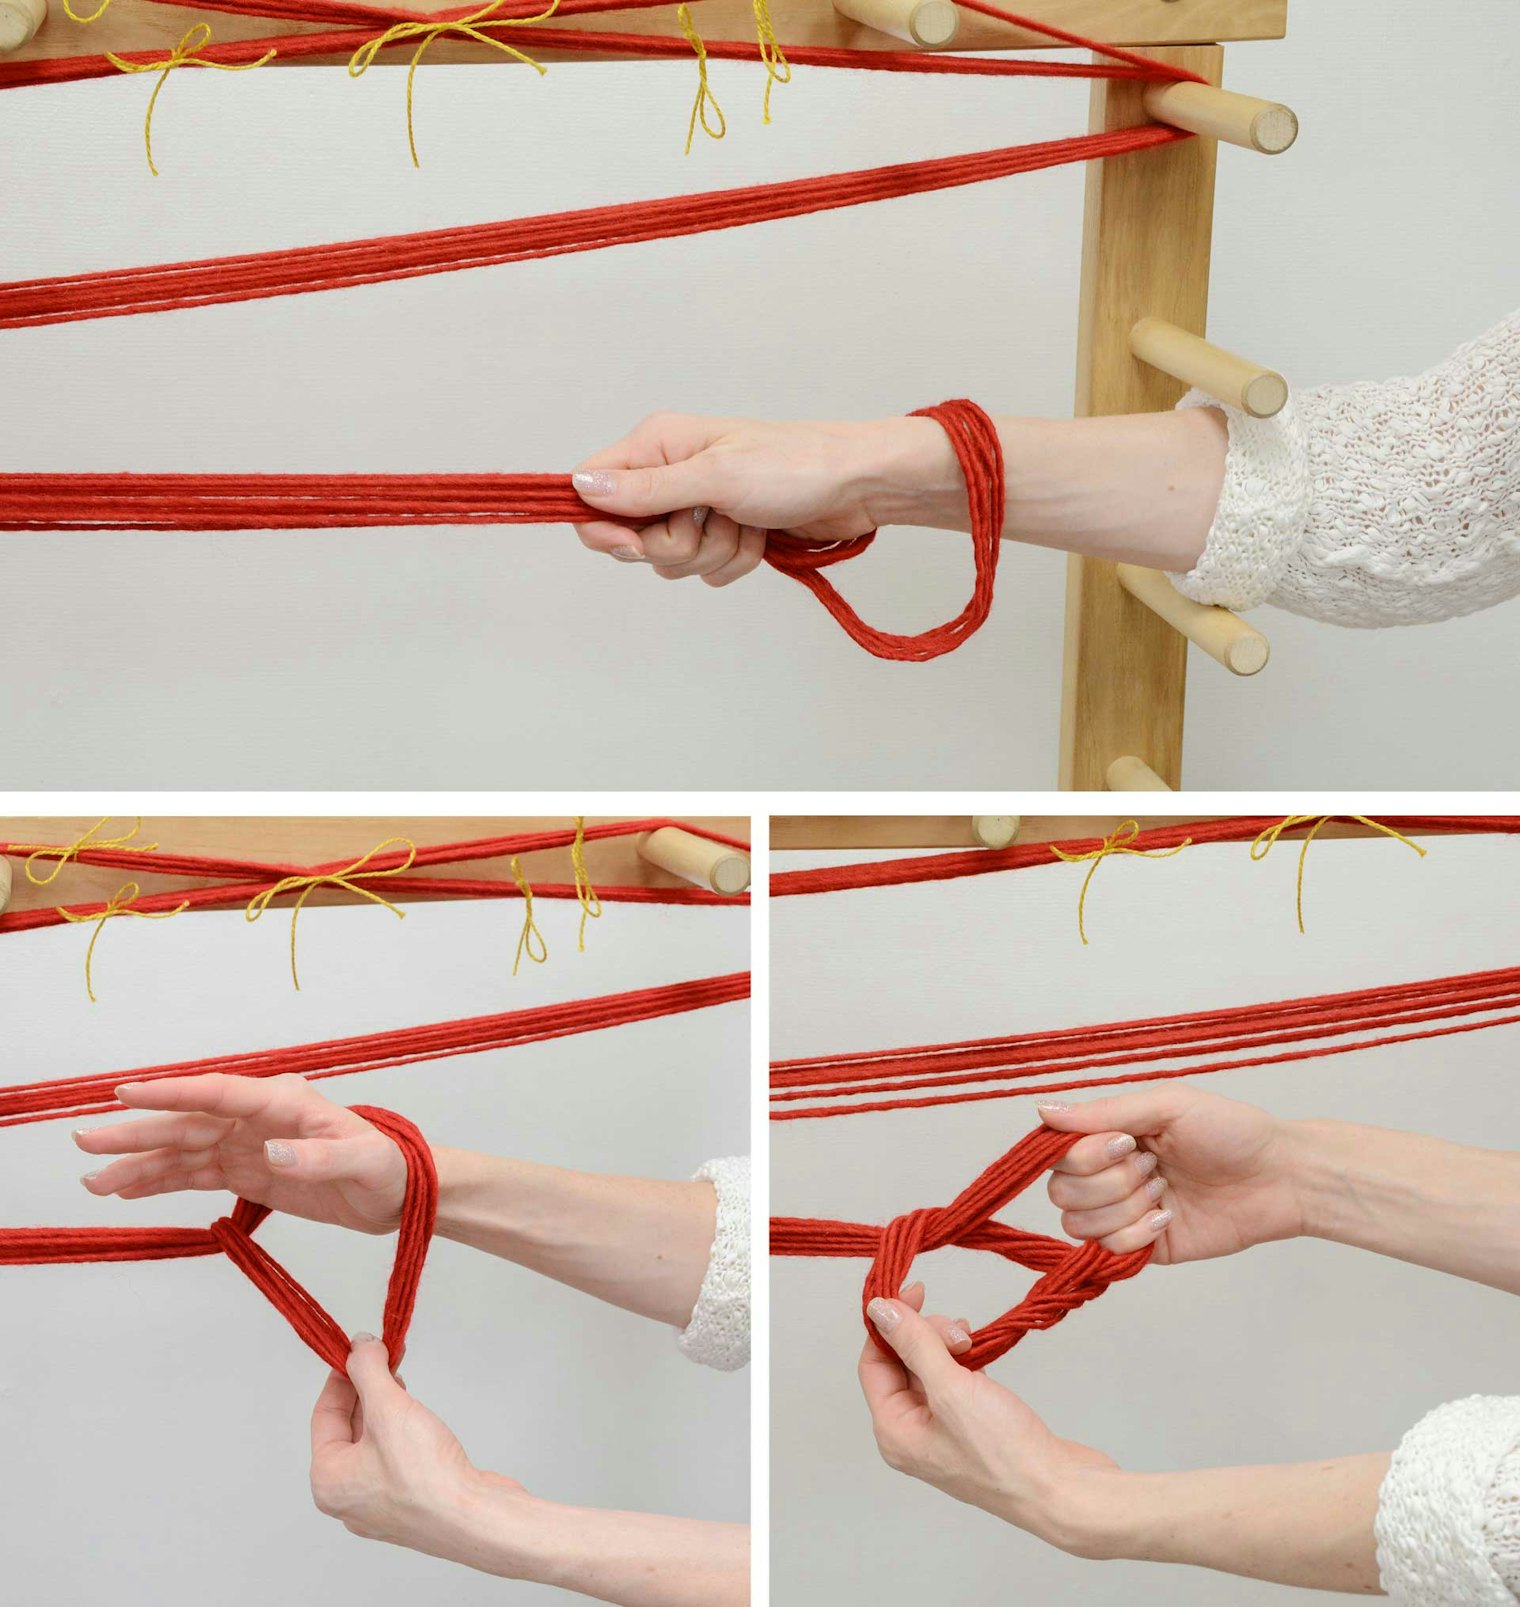
Chaining the warp, beginning at the ending peg. Note the ties around the porrey cross at the lower left. Photos by Anna Hurla
Chaining: To keep your warp organized off the warping board, you’ll want to chain it as you remove it. Starting at the bottom, pull the looped threads off the ending peg while maintaining the open loop. Stick your hand through that loop and grasp the entire group of warp threads that‘s next to your hand. Pull the loop that is resting on your wrist over those threads. You‘re now holding a new loop. Push your hand through this new loop, grasp all the warp threads just beyond it, and pull them through the loop. (See photos above, beginning at the top and moving counterclockwise.) Keep a little tension on the warp as you go, so the threads don’t pop off the next peg.
Continue chaining the warp, including the porrey cross area, until you get to the top of the board. Hang the last loop of the chain on a peg at the top of the warping board to hold it while you pull the threads off the starting peg. You can cut the loops that were on the starting peg by sliding them onto a pair of scissors, or wait to do that until you‘re ready to start sleying.
Warp Winding Tips
1: When winding an extra-wide warp, don’t wrap threads on top of other threads—instead, make multiple narrower warp chains and number them so you put them on the loom in the right order. As you finish up each warp section and tie a bow around your porrey cross, add an extra bow to indicate the last warp end of that chain. Orient the bows on the same side of the chains when you assemble them at the loom.
2: When you come across a knot or reach the end of a cone or skein, wind the yarn back to the closest starting or ending peg, and tie it off on that peg. If there is a knot, discard the section of yarn leading up to it. Then tie on the new end at the same peg and continue winding.
3: Watch out for accidentally winding warp threads that turn back before completing their full path. If you find any of these short threads, unwind them back to the starting peg and rewind following the correct path. If the problem area is a ways back and you don’t want to unwind all the way back to it, mark the short ends with a piece of scrap yarn, then simply wind on two additional threads of the appropriate color to serve as replacements. If the warp is striped, you can move the new ends to their proper place when you sley the reed. And whatever the color of any short ends, as you sley the reed you should set them aside to be discarded.
MORE: For a print-friendly version of this information, check out the Best Practices eBook. You'll learn next steps as well—including threading and sleying, winding on, interpreting drafts, and fixing mistakes.
SUSAN BATEMAN, weaver and teacher, started Yarn Barn 50 years ago. Her hobbies include weaving, working on the farm, volleyball, and bridge.
MELISSA PARSONS has been weaving since 1988. She started working with Susan Bateman at the Yarn Barn in 1992.
Warping a Loom, Part 3: Sleying and Threading
Careful attention at this stage will pay off with fewer errors, fewer tangles, and fewer broken ends as you weave.
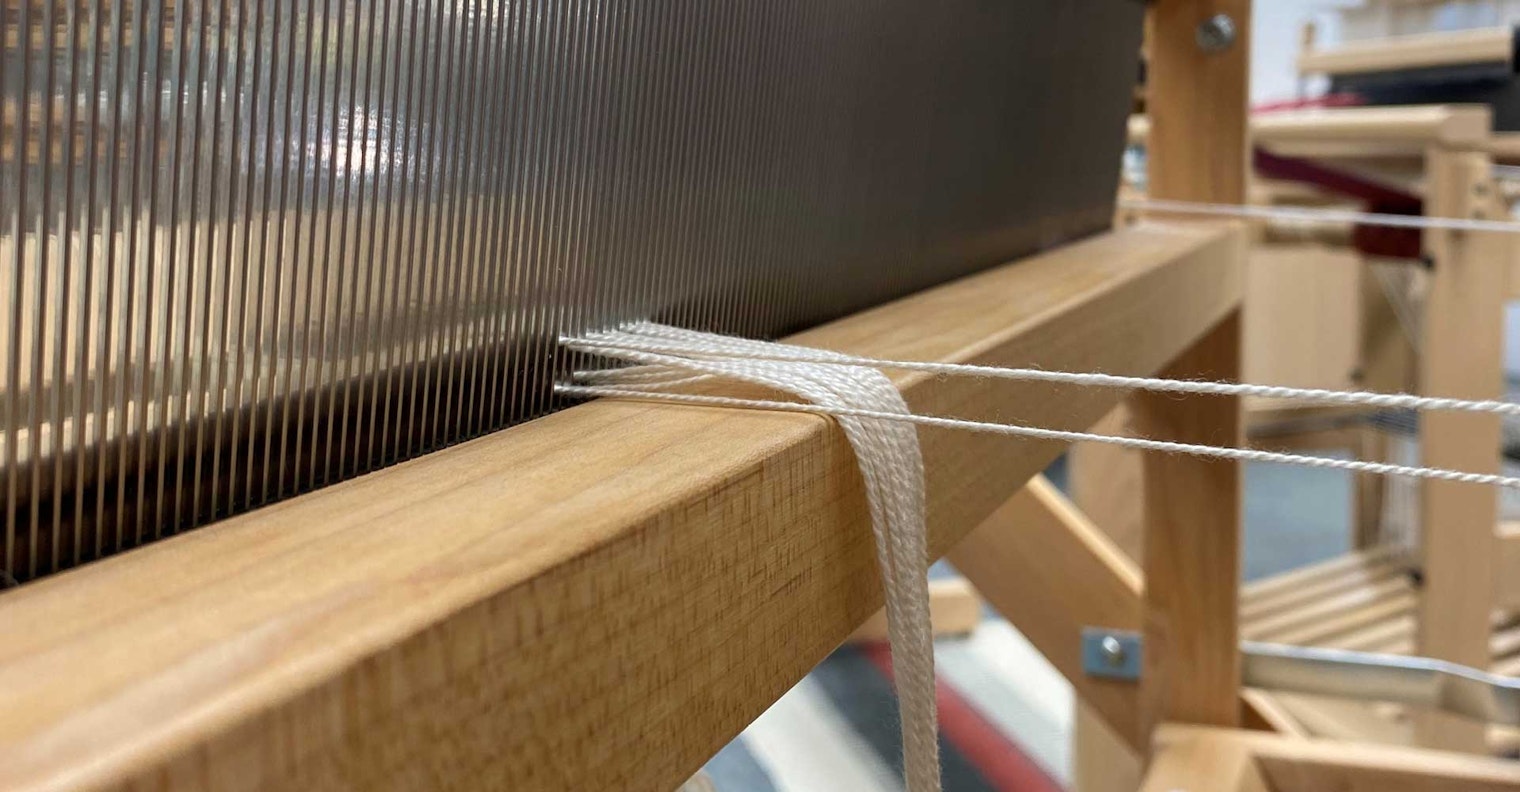
Part 1 of this series teaches you how to plan a path on your warping board, and how and why to create a porrey cross, along with providing some general tips about winding a warp. Part 2 of this series covers how to wind warp stripes, some tips for keeping track of how many ends you‘ve wound, and how to take your newly wound warp off the warping board without losing control of all those ends.
In this installment, we‘ll talk about sleying and threading. At the Yarn Barn, we teach front-to-back threading, but most of these techniques also apply if you work back-to-front. Whichever way you choose to warp, be tidy—care taken at this stage pays off with fewer errors, fewer tangles, and fewer broken ends. Best of all, it gets you weaving faster.
Preparing the Loom
Before you begin, count the heddles on each shaft and redistribute them as needed. Inserted eye heddles and flat steel heddles have a left or right orientation. Flip them top to bottom to change the direction if needed.
Evenly divide any extra heddles on each side of your loom. Leaving all the empty heddles on one side can abrade warp ends or unbalance the shaft. If your warp will fill the shaft frame completely, remove all extra heddles or plan to distribute them among the threaded heddles as you work. If your loom has heddle clips or hooks in the middle of the frames, release them so the heddles can slide freely and push them all toward the middle.
Finally, determine your comfortable working height. Raise the shafts and tie or brace them in place. Get a chair or stool that puts your eyes at a good level for sleying the reed and threading the heddles. If your loom‘s back beam is removable, take it off. Add a lamp for extra light, if needed.
Center the reed in the beater. If your beater has a pin to hold it in a fixed position, use it. If not, tie the beater to the breast beam and castle so it doesn’t move during sleying.
Set a pair of lease sticks (flat, smooth sticks about 1 inch wide with holes on both ends) that fit your loom’s width in front of the beater.
Situating the Warp
Orient the warp according to the draft as you sit at the loom to weave. If you have multiple warp chains, put them in the correct order. If you haven’t already cut the threading end of the warp chains, do so now.
Cut two pieces of a nonstretchy cord 18 inches longer than the depth of the loom. Tie one end of both cords to the back beam, one on each side of the loom. Bring one cord end toward the front of the loom, through the castle and beater, and then pass it up through the hole in the first lease stick and down through the hole in the second lease stick. Tie the cord to the breast beam so the cord is taut.
Your warp chain should still have the tied porrey cross. Slide the loose ends of the lease sticks through the warp bundles, positioning one on either side of the porrey cross with the cut ends of the warp toward the beater.
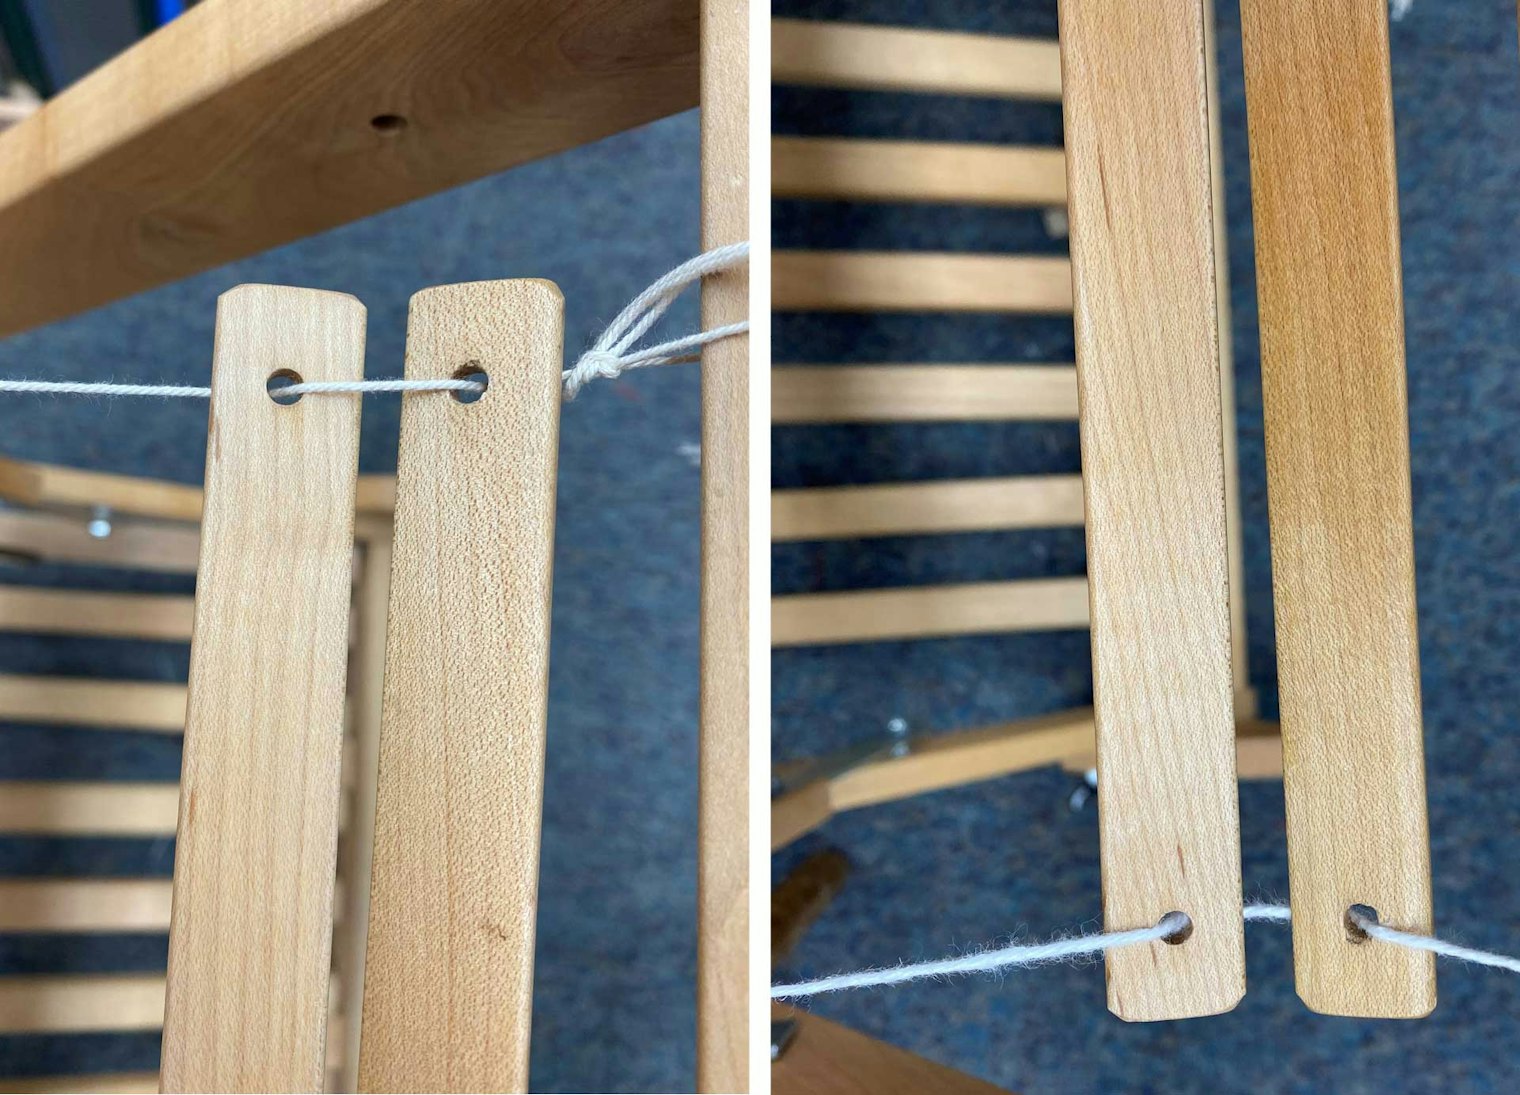
Left: On one side, bring the cord up through the first lease stick and down through the second before tying it to the breast beam. Right: On the other side, bring the cord down through the first lease stick and up through the second before tying it to the breast beam.
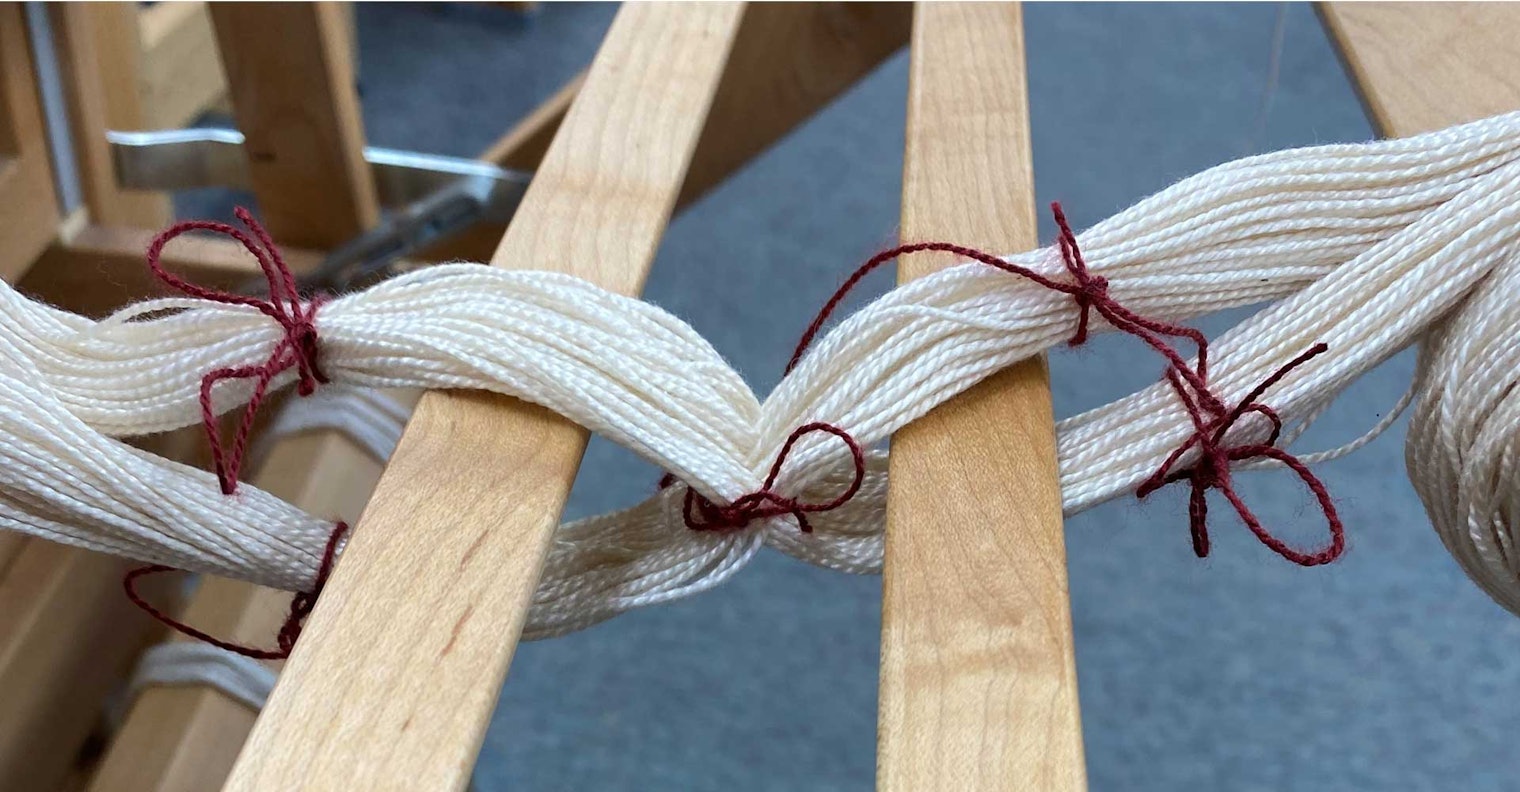
Lease sticks slide through the sides of the porrey cross, keeping the warp ends in order.
Pass the second cord through the harnesses and beater and thread it through the lease sticks, but this time take the string down through the hole in the first lease stick and up through the hole in the second one; this change in direction will hold the sticks flat while letting them slide along. Tie the second cord to the breast beam.
Wrap the rest of the warp chain around the breast beam several times to secure it, to keep the warp untangled, and to prevent it from pulling out of the reed. Unchain it as needed as you sley.

Notice that the warp passes over the breast beam rather than under it on the way to the reed.
Sleying the Reed
From this point on, be sure to tie the ends that you‘ve already sleyed or threaded in bundles behind the reed or harnesses to keep them secure.
Remove all five ties from around the porrey cross. Find the center point of the reed. Your starting dent is half of the width of your project from this point, either to the left or to the right. Select the first end in the porrey cross. Use your reed hook to pull it through your starting dent but don’t pull the end out of the porrey cross as you sley the reed. Find the next end in the porrey cross, and continue sleying the appropriate number of ends per dent according to the draft. After you have sleyed a few ends, tie them together behind the reed to prevent them from slipping out. Continue across the warp.
Sley any floating selvedges, each in its own dent, on the sides of the warp.
Sleying Tips:
-Good lighting is essential during sleying.
-Insert the reed hook into each dent from the back, select the next warp end, and pull the end through the reed.
-If you‘re sleying multiple ends in a dent, it‘s fine if the last dent holds fewer ends than the others.
Threading the Heddles
If the warp ends don‘t have enough slack to reach through the heddles, pull the warp forward and then retighten the chain around the breast beam. Release the beater and let it rest against the castle.
Orient your draft correctly: Sit at the loom as if to weave. The rightmost end marked on the draft will be the rightmost heddle threaded on your loom. The bottom row on the threading draft represents the shaft closest to you.
Take your draft to the back of the loom but don’t change the orientation of the paper to the loom. The bottom of the page should still face the breast beam. Place the draft where you can see it (set don your knees, on the lower edge of the harness frames, or on a handy surface), or tape it on the castle.
You can thread the heddles working from left to right or from right to left. Each symbol or number on the draft represents a warp end, and in most cases each end will have its own heddle. You may have sleyed the reed with more than 1 end per dent (for example, 2 per dent to get 24 ends per inch in a 12-dent reed), but that doesn‘t matter as you thread the heddles. In a very few cases, multiple threads serve as 1 warp end and are identified as such in the draft; those should all be threaded in the same heddle.
Push the lease stick that is closest to the beater all the way up to the reed, and then look at the first end in the porrey cross. Does it go over or under the lease stick at the beater? You will alternate between over and under as you select each end to thread from each dent, even when the dents hold different numbers of ends (for example, 1-2-1-2).
Why do we go to the trouble of making sure that the reed and heddles are threaded in the same order as the porrey cross? As you beam a warp, if the ends are all in order with no crossing, you minimize tangling. Crossed ends make for warp snarls, which slows the beaming process. They can also cause tension problems that lead to broken threads.
Reclip the hooks on the heddle frames if applicable, allowing the warp to flow around them with minimal thread displacement. Slide all the heddles for the first side you‘ll thread to the center.
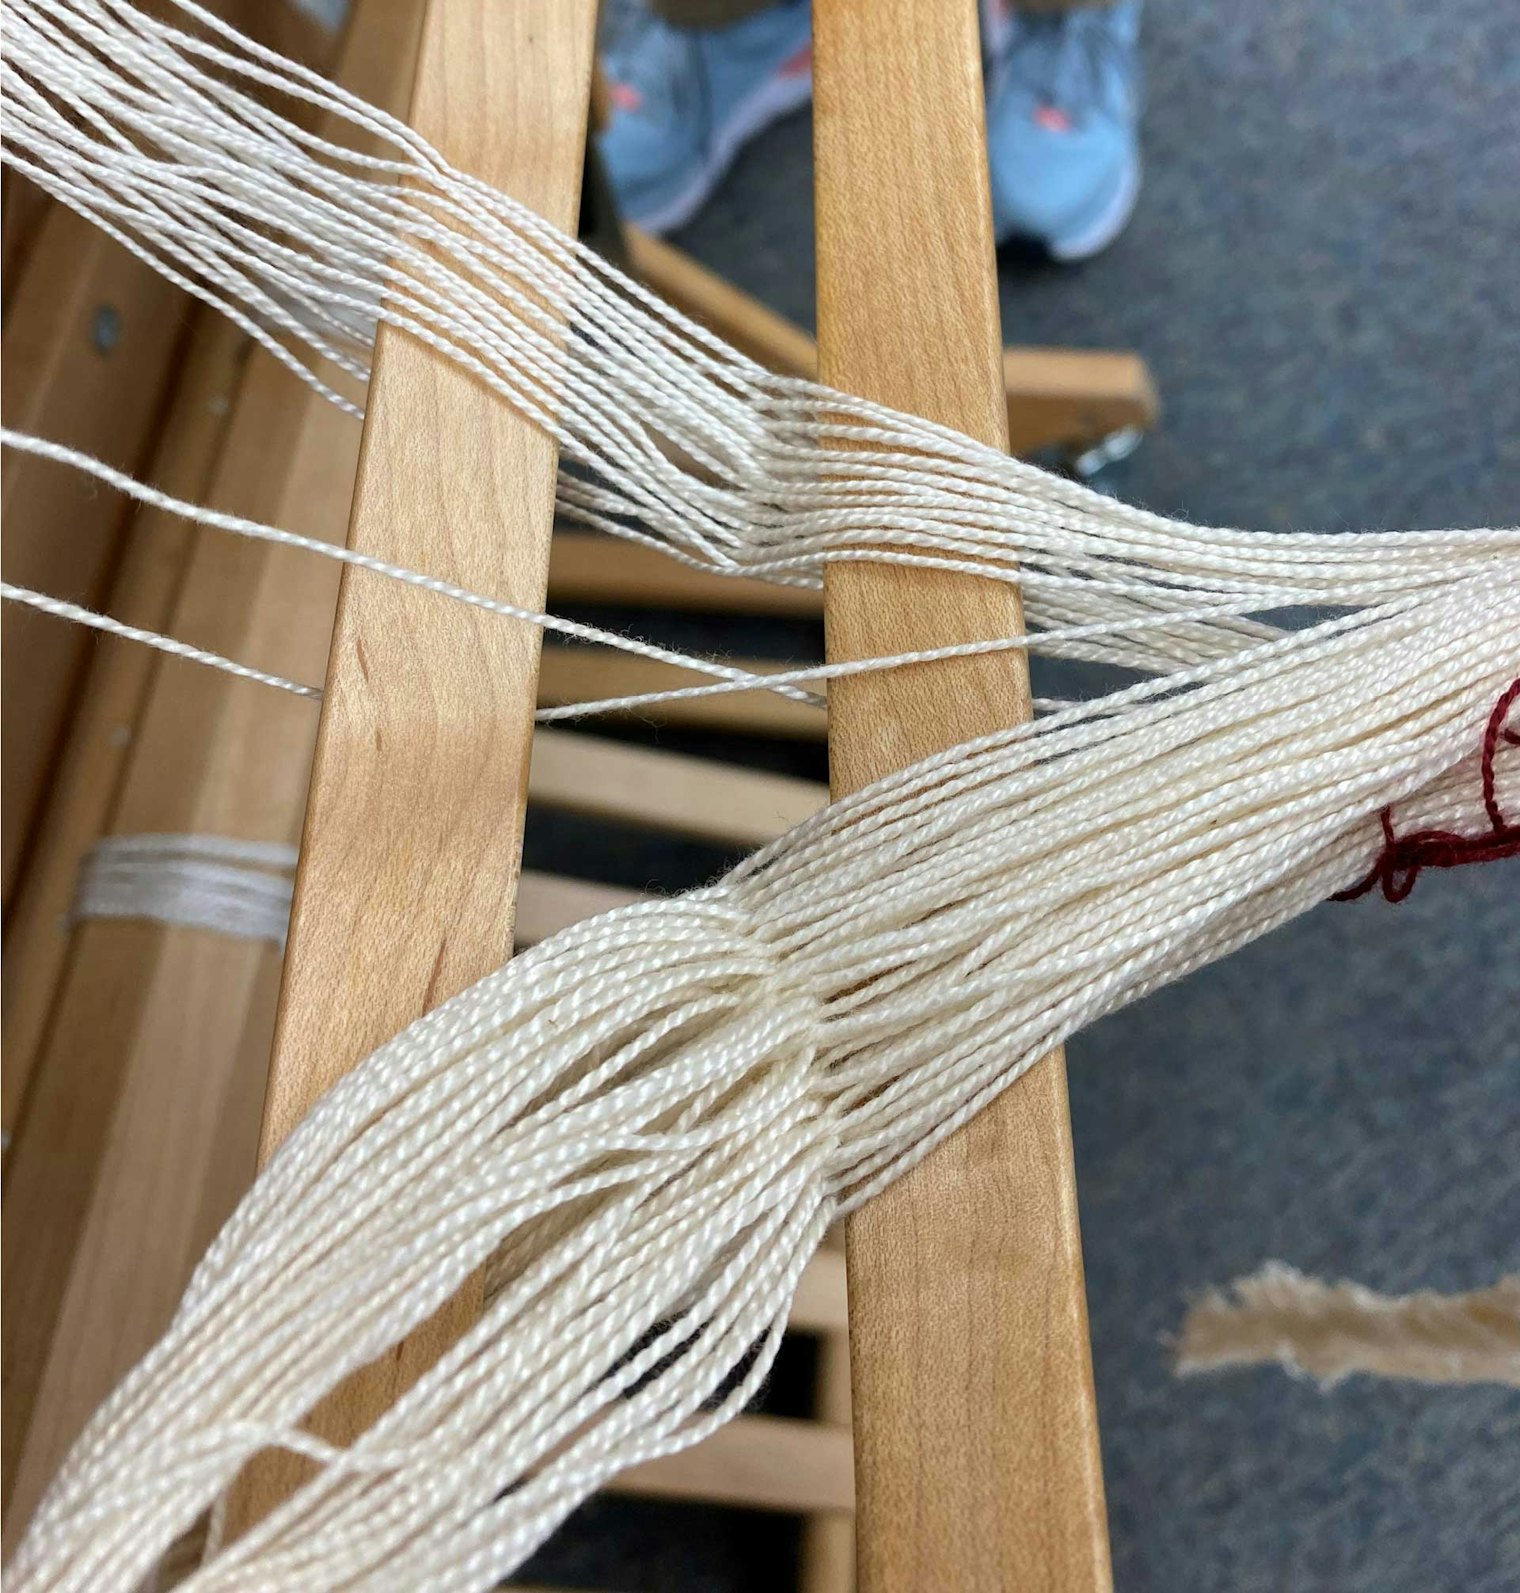
Keep your porrey cross intact and your hands free while warping through the use of lease sticks.
Work methodically in chunks: On your draft, count the number of ends in a repeat or small section of the threading, as well as how many of those ends are on each shaft. On each shaft, separate the heddles you‘ll use for the first section from the rest.
Following the draft, select the first warp end from the porrey cross and use your fingers or a threading hook to pull it through the first heddle on the first shaft. Pull the second end through a heddle on the second shaft. Repeat, threading the heddles according to the draft and alternating over and under ends out of the porrey cross as you go.
When you finish a section, you should have used all the heddles you counted out for it—if you ran out of (or have leftovers), go back and check your work. When you are sure the ends in each section are threaded correctly, tie them loosely in a bundle to secure.
Repeat the threading process section by section. When you reach the center of the warp, move any leftover heddles to the far side of the loom. Select the next group of heddles for threading, as you did for the first half.
Tips for Avoiding Threading Errors
- Use signposts in the draft to verify that you haven’t made mistakes. For example, if the stripes in a warp always start on shaft 2, note that. If you are ready to start a stripe but the next end will be on shaft 1, go back and find your threading mistake in the previous section.
- Work from a copy of your threading draft that is increased in size for better visibility, and record your progress on it as you thread.
- Check and bundle batches of warp ends as you go, using stopping points that make sense to you. For example, you might go back every two repeats to make sure the threading is correct, then tie the ends in a loose bundle.
MORE: For a print-friendly version of this information, check out the Best Practices eBook. You'll learn next steps as well—including winding on, getting good tension, interpreting drafts, and fixing mistakes.
SUSAN BATEMAN, weaver and teacher, started Yarn Barn 50 years ago. Her hobbies include weaving, working on the farm, volleyball, and bridge.
MELISSA PARSONS has been weaving since 1988. She started working with Susan Bateman at the Yarn Barn in 1992.
Warping a Loom, Part 4: Winding On and Tensioning
Consistent warp tension is no mystery—just follow these steps as you wind on.
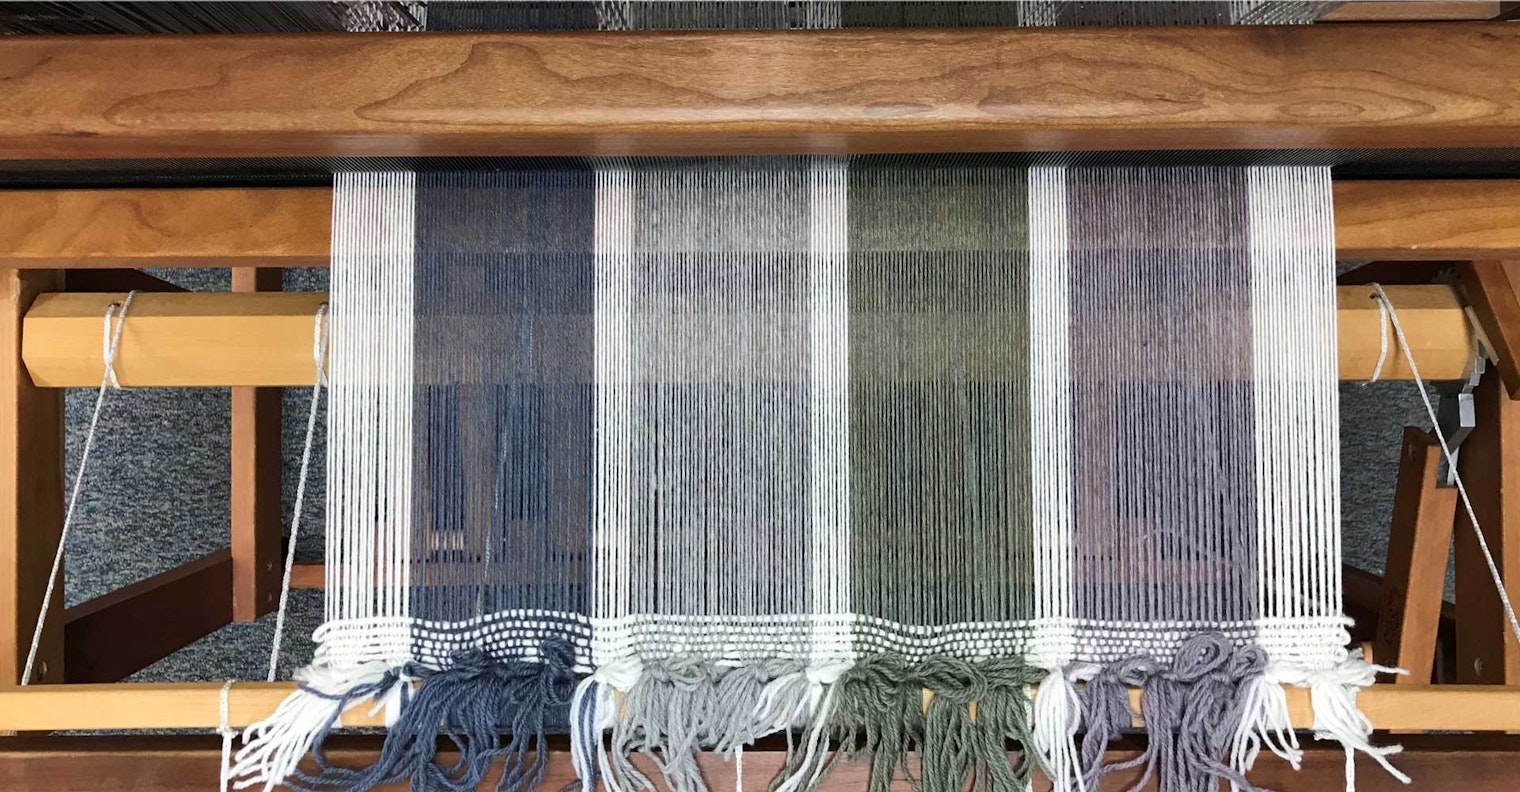
Part 1 of this series teaches you how to plan a path on your warping board, and how and why to create a porrey cross, along with providing some general tips about winding a warp. Part 2 covers how to wind warp stripes, some tips for keeping track of how many ends you‘ve wound, and how to take your newly wound warp off the warping board without losing control of all those ends. Part 3 covers how to prepare your loom for dressing, tips for using lease sticks and situating the warp, and how to sley the reed and thread the heddles.
In this Best Practices installment, we‘ll cover how to put an evenly tensioned warp on the loom. Why is even tension important? Because uneven warp tension leads to broken threads (among other headaches), and beaming correctly is your best opportunity to get the tension right.
When your loom is sleyed, threaded, and ready to beam, leave the warp chain wrapped around the breast beam before tying onto the back beam. If the cut ends of the warp don’t reach past the rear apron bar, ease the warp forward without unwrapping the chain from the breast beam. Leave the lease sticks in place. If you‘ve lost the cross, don’t panic. You can regain it (or something that‘s close enough) later.
Tying On to the Back Beam
Start by centering the apron bar across the width of the loom and with the apron cords going in a straight line from warp beam to bar, or from the apron to the apron bar, and ensure that the apron cords reach over the back beam. Sitting or standing at the back of the loom, grasp a group of warp ends that equals about 1 inch in the reed. The straighter the path the warp makes without splaying, the better the tension will be.
Even up the tails in the group of warp ends you are tying. Doing so has two benefits:
• It makes the most efficient use of your yarn. If you have a tail that is 2 inches longer than the rest of the ends at the back, it will be 2 inches shorter at the front, causing you to waste 2 inches of warp length.
• Evened-up warp ends don’t tangle as you beam.
Divide the bundle in half and bring the two halves over and around the apron bar. As you bring the two halves back up, tie them around the rest of the bundle with a square knot on the top. Do not pull the warp tight—your goal is uniform knots with short tails. The warp itself can be slack.
Repeat the process across the warp: Select a group of ends, even up their tails, divide the bundle in half, and tie the ends around the apron bar. When you reach an apron cord, tie on to the side that best keeps your warp traveling in a straight line from reed to apron rod.
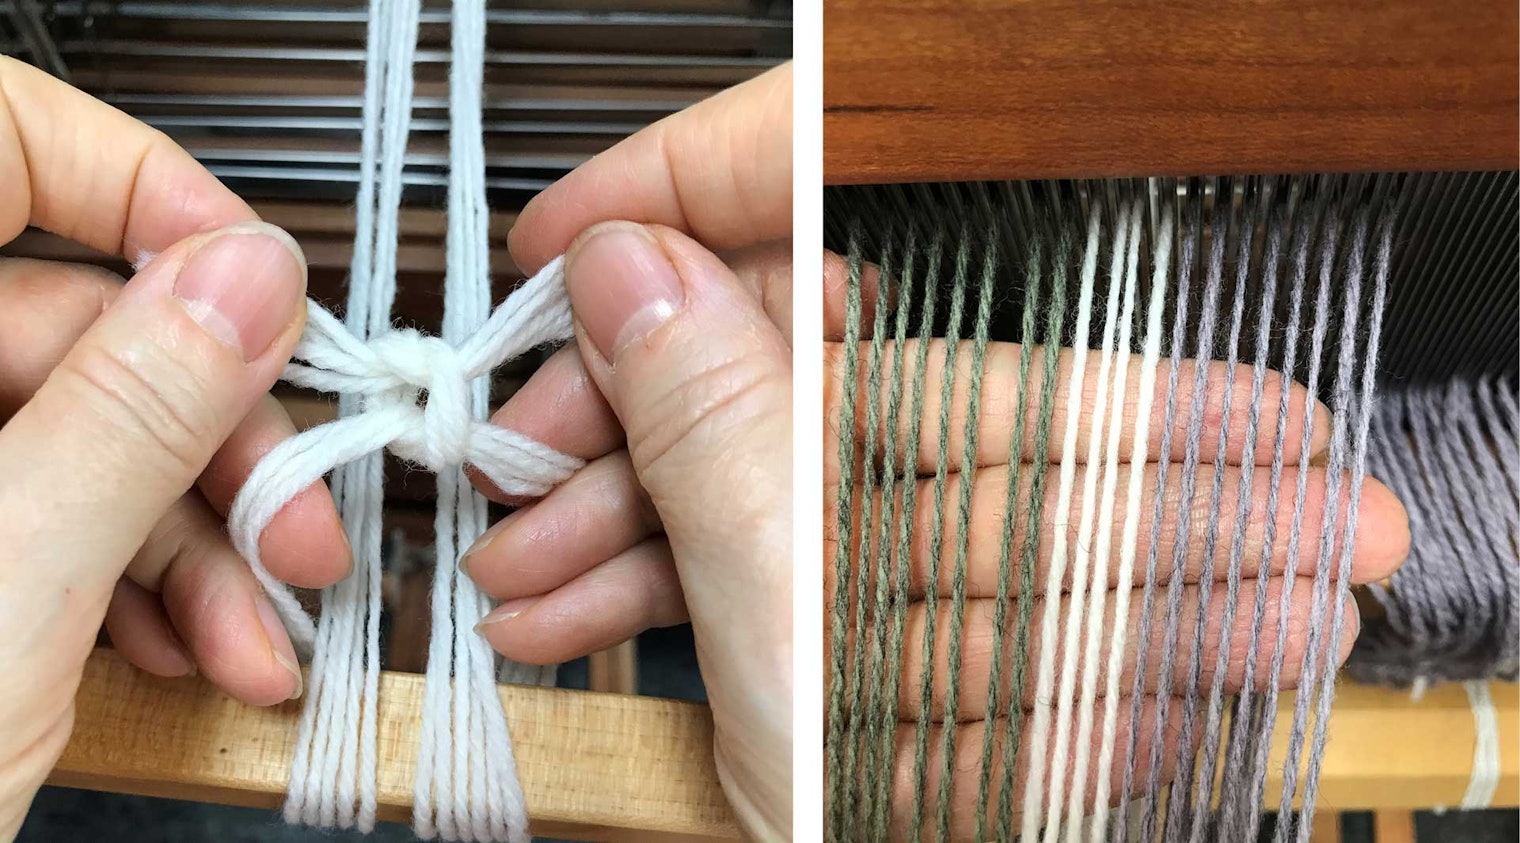
Left: A basic square knot is used for tying onto the back beam. Right: Sometimes ends are sleyed through the wrong dents, resulting in unintentional skipped and doubled dents, as shown here.
Get Ready to Wind On
Tie up the treadles to the shafts. If you‘ve lost the cross, here‘s where you can reinsert the lease sticks. Look at the draft and determine if there is a true plain weave. If there is no true plain weave, a mock plain weave will work. Standing at the front of the loom, unwrap the warp chain from the breast beam and pull on it to put the warp under tension. Then, step on the first plain-weave treadle and insert a lease stick into the shed between the breast beam and the castle. Pull it toward you. Close that shed and open the other plain-weave shed to insert the second lease stick. Secure the sticks with cords, and you are ready to beam!
Gather heavy paper, corrugated cardboard, or warping sticks to use as warp separators. Warp separators provide an even, flat surface to wind the warp on. If you don‘t use them, some warp ends will ride on top of ends on the previous wrap and some will dig down among the threads below, resulting in uneven tension. Paper grocery sacks cut apart into flat sections work fine, although they‘ll lose their stiffness after several uses and must be replaced. Whatever material you use must be at least an inch wider than the width of your warp in the reed, but not so wide that it gets in the way of the brake.
Determine the correct direction to turn the crank on the warp beam, as turning the wrong way will prevent the brake from holding. Try turning the crank slightly in one direction with the brake engaged. If the warp beam turns, that is the way you should turn the crank to wind on. (If you have a friction brake, don’t be tempted to skip releasing the brake while beaming—turning the crank for an extended time with the brake engaged will damage the brake drum.)
Developing a Rhythm
To begin winding, grasp the warp chain at the front of the loom and give it a hard yank. This should make most of the warp ends jump into their proper places. Don‘t comb your fingers through the warp—doing that only makes tangles worse. With the yarn under tension, pull the lease sticks toward the breast beam. If you see snarls, yank the warp again. If needed, pluck or strum the warp until the snarls release.
If you have a helper, one person can hold the warp chain and put consistent light tension on it while the other person releases the brake and cranks. If you‘re warping solo, you’ll need to move back and forth between the front of the loom and the crank. You can rest the beater against the lease sticks to provide some additional tension. Crank until you start to see the warp snarling at the lease sticks, which will have shifted closer to the reed. Yank the warp chain again to release those snarls, pull the lease sticks back toward the breast beam, and continue winding.
At the back of the loom, when you see that the apron bar is about to wind onto the warp beam, insert a warp separator between the layers. As you continue winding, add more separators as needed for the length of the warp.
From the front of the loom, periodically grasp the entire warp chain and give it a hard, steady pull. This tightens up the warp within the layers on the warp beam, and helps to keep your tension even. Occasionally check that the warp is not splaying out as it travels over the back beam: it should be the same width there as it is in the reed.
Stop cranking when about 4 inches of unwound warp remains in front of the breast beam. Remove the lease sticks, and cut the loops at the end of the warp.
Tips for Good Warp Tension
- As you tie groups of warp threads onto the back beam, keep in mind that the straighter the warp travels from the reed to the warp beam, the better the tension will be.
- Use separators as you wind to keep the warp layers from bunching, tunneling into previous layers, or splaying.
- Don‘t comb your fingers through the warp chain if you come across snarls while winding—doing that only makes tangles worse. Instead, yank, pluck, or strum the warp to free up any stickiness.
MORE: For a print-friendly version of this information, check out the Best Practices eBook. You'll learn next steps as well—including fixing warping mistakes.
SUSAN BATEMAN, weaver and teacher, started Yarn Barn 50 years ago. Her hobbies include weaving, working on the farm, volleyball, and bridge.
MELISSA PARSONS has been weaving since 1988. She started working with Susan Bateman at the Yarn Barn in 1992.
Warping a Loom, Part 5: Finding Errors
Check your work—and then it’s time to weave!
Part 1 of this series teaches you how to plan a path on your warping board, and how and why to create a porrey cross, along with providing some general tips about winding a warp. Part 2 covers how to wind warp stripes, some tips for keeping track of how many ends you‘ve wound, and how to take your newly wound warp off the warping board without losing control of all those ends. Part 3 covers how to prepare your loom for dressing, tips for using lease sticks and situating the warp, and how to sley the reed and thread the heddles. Part 4 covers winding on an evenly tensioned warp.
You’ve been busy—you‘ve wound a warp, gotten it on your loom, and sleyed and threaded the ends. In this Best Practices installment, we‘ll cover how to find and fix mistakes, and (finally!) tie on and get you weaving.
Recognizing and Correcting Mistakes
I’m afraid we’ve got some bad news for you—you’ve probably made a mistake or two as you sleyed and threaded your warp. Here’s the good news: Most threading and sleying mistakes can be easily found and fixed.
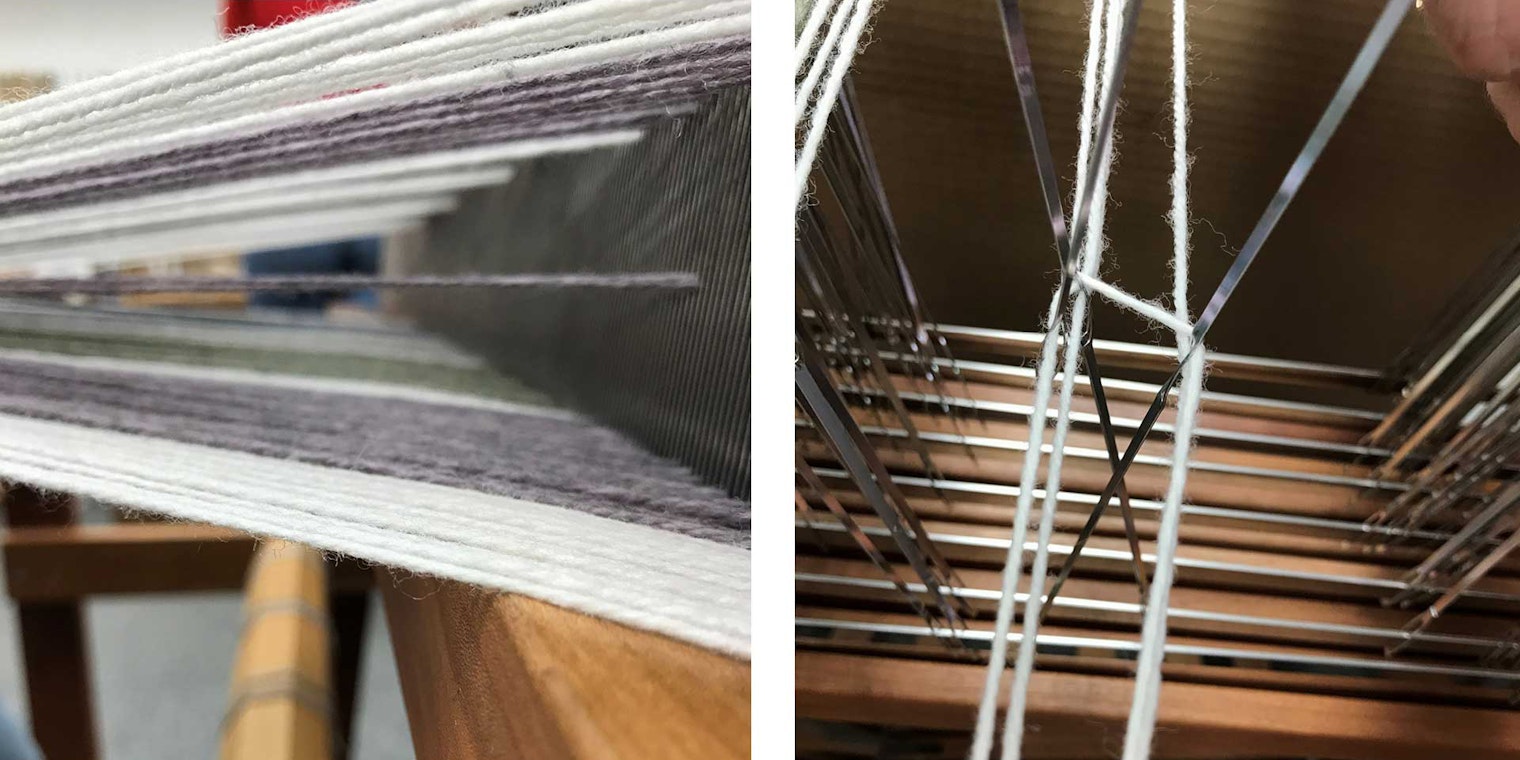
After your warp is wound onto the back beam, grasp it and put it under tension. Step on the first treadle and look through the shed from the side to see if it is clear. If it’s not clear, two ends may be twisted between the heddles and the reed. If this is the case, pull both ends out of the reed. Separate them to determine the correct order and then re-sley them. Step on the treadle again to check your work, and then move on to the next treadle. Repeat this process with each of the remaining treadles.
An end wrapped around a heddle can also cause tangles in the shed. Step on the treadles one at a time, follow the path of any clumped ends, check the heddles, and make the necessary correction.
Stepping on a plain-weave treadle makes it easier to spot sleying errors. Look for missed dents or for doubled-up ends that show up as unevenness in your warp. To correct this problem, don’t pull multiple warp ends out of the reed. Instead, shift the ends one at a time with your reed hook: Reaching from the front to the back of the reed, catch each end behind the reed and pull it through the desired dent. To make space for doubled-up threads, start at the closest selvedge and shift ends one at a time to free up a dent.
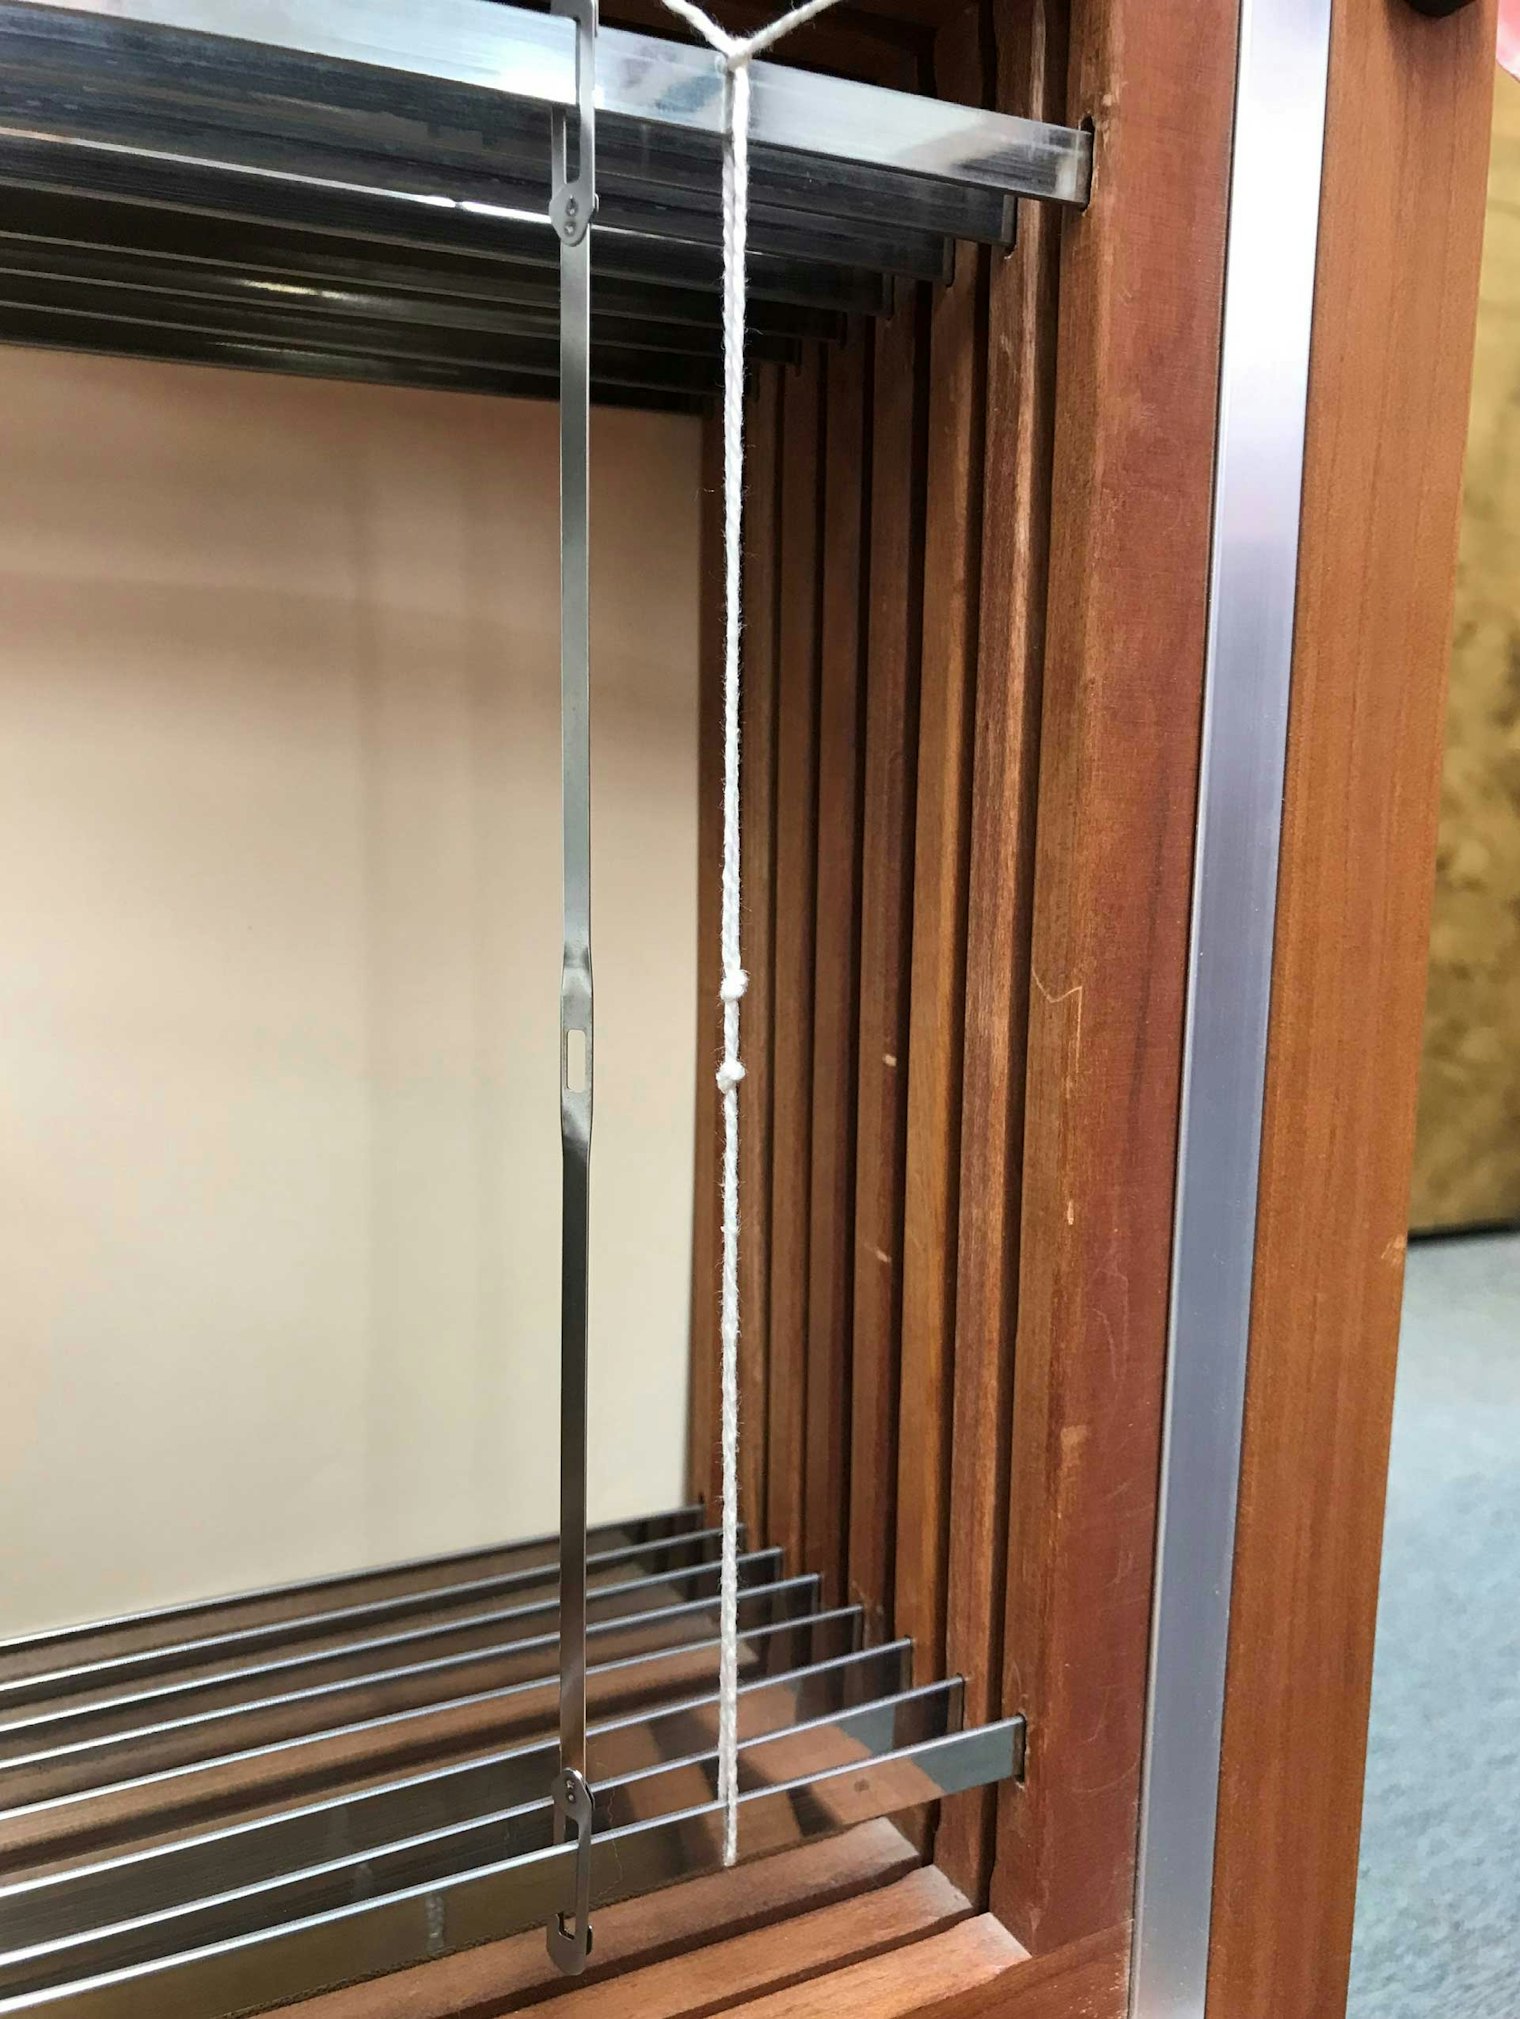
A string repair heddle next to a flat heddle
If you have a warp end in the wrong heddle, you can use a snap-on repair heddle to correct it. Simply snap the heddle into the correct place, and then pull the end out of the wrong heddle and put it into the repair heddle. When you’re doing this, take care not to twist the end around any adjacent heddles or warp ends.
If you don’t have repair heddles, you can [make a string heddle](https://handwovenmagazine.com/a-no-tears-repair-heddle](https://handwovenmagazine.com/a-no-tears-repair-heddle/). If you discover multiple threading errors in a section of the warp, you may need to rethread that entire portion from the front of the loom.
Finally, check the path the warp ends take from the back of the loom to the front. If they are deflecting around the heddle bar hooks, release the hooks, slide the heddles over so that the warp ends take a straight path, and then reclip the heddle bar hooks.
Tying Onto the Front Apron Bar
After you’ve fixed any errors, you’re ready to tie onto the front apron bar. Although all parts of winding on are important for even tension, this is a critical step. Here is where you can obtain even tension...or doom yourself to struggle for the rest of the project.
Position the end of the warp and the apron rod so that you have enough length to tie onto the bar without wasting warp. If needed, release a bit of warp or wind on a little more, or turn the cloth beam to adjust the position of the apron bar. Comb though the warp with your fingers to get rid of any tangles (it’s okay to do that now).
You’ll probably develop your own style for the next few steps, but we’ve found it best to alternate sides while tying the warp to the apron bar. Either start at the center and work your way out, or start on the outside and work your way to the middle—whichever you choose, make a few ties on one side and then a few on the other.
To make each tie, grasp a group of warp ends that is no more than 1 inch wide in the reed and pull firmly. Pinch the bundle between the finger and thumb of your other hand and pull. Loose threads will move toward you, and you can tighten them up.
Just as you did when tying onto the back, divide the bundle of ends in half, making sure you don’t have any crossed threads. Bring the two half bundles over and around the apron bar and then up on either side of the bundle. Make a half knot on top. To tighten, put your thumbs on each side of the knot, against the tails, push toward the beater, then pull outward. Leave as a half knot. Move on to the next group and continue until the entire warp is tied in half knots. Ensure that your warp bundles come directly toward you from the reed and not at an angle.
Close your eyes and run your fingers across the warp, feeling for irregularities. Loosen or tighten any sections where you feel a difference in the tension. This can be a slow process, but it is worth taking the time to make sure the tension is perfect. Uneven tension is the primary cause of broken ends. (You can even use a relatively weak yarn for a warp as long as you tension it properly.)
Using the alternating sides method, turn the half knots into bows or half-bow knots. Either type of bow lets you release the knot easily to adjust the tension, and it makes it easy to take the fabric off the loom.
Weave a plain-weave header and then check for dips or undulating picks. These indicate uneven tension. Loosen and retension if necessary. If the tension is very uneven, take out the header, go back, and retie the warp.
Is your tension even? Congratulations! You’re ready to weave!
MORE: For a print-friendly version of this information, check out the Best Practices eBook. You'll learn next steps as well—including fixing warping mistakes.
SUSAN BATEMAN, weaver and teacher, started Yarn Barn 50 years ago. Her hobbies include weaving, working on the farm, volleyball, and bridge.
MELISSA PARSONS has been weaving since 1988. She started working with Susan Bateman at the Yarn Barn in 1992.